

Creating a Vector Travel Mug in CorelDRAW
(available in video format here)
Sometimes it can be a challenge to choose subject matter for your vector illustrations. One option that you have is to simply look around you. Sometimes you can find a subject right under your nose. I took a photo of this travel mug that is on my desk and at this moment filled with hot coffee.
You would be surprised at what is in your own house or apartment that you can use to create vector illustrations. Just be careful and do your research on the Microstock sites to make sure the market is’nt over saturated. Still, don’t let that discourage you too much. I have created illustrations of the same object as many other artists and still had good sales on them. Each artist has his or her own interpretation and all are different. Just make it your own by giving it your own special touches.
You can right click on the image below and then choose Save Image As, save it to somewhere on your computer. A good place might be in your My Pictures folder or perhaps on your desktop.

In CorelDRAW open a new document.

Back in CorelDRAW go up to File in the top menu and click on Import. This opens up a browse window where you can browse for your image. Select the image from where you saved it and click Import.

Using the pick tool size and position the image how you want it on the document.

One way to help in seeing your vector lines is to change the size and color of the outlines. Make sure nothing is selected. Choose Outline Pen from the tools on the left.

Go down to .5 pt and select it. This gives you a .5 point outline.

By default there should be a palette on the left side of your workspace. If not go to Window in the top menu, click on Color Palettes and then choose CMYK Palette.

Click on your Bezier Tool.

With the Bezier Tool Selected go over to your palette and left click on the box with the X at the top.

When the box pops up click OK.
This left click on the color palette chooses what fill color we want and since we don’t want a fill color we are choose no fill represented by the X.
We do want an outline color, so right click on the bright blue cyan color. Again click OK when the box pops up.

Use the Zoom Tool as needed. To use this click on the Zoom Tool.

Your cursor turns into a magnifying glass icon with a plus sign inside. Left click to zoom in, Right click to zoom out. You can also use the wheel on your mouse to zoom in and out.

Using the Ellipse tool create a ellipse that conforms to the top outside rim of the lid on the mug. Copy and paste this and move the new ellipse down to where the lid screws into the mug.

Go to the Rectangle tool and create a rectangle that goes from the widest edge of the upper ellipse to the widest edge of the lower ellipse.

In the top menu go to Arrange, then Shaping and select Shaping.
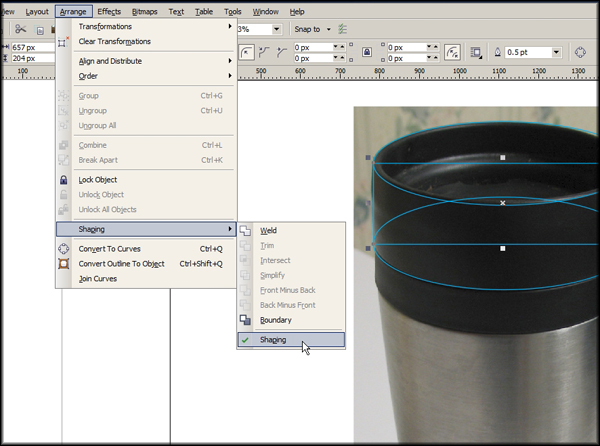
Make sure you have Weld selected in the drop down menu of the Shaping panel.

Select the lower ellipse and click on Weld To. Click on the rectangle. The two objects are now welded into one single object.

Choose Trim in the Shaping panel drop down menu. Select the ellipse at the top. Click on Trim.

Now select the bottom object and the ellipse shape trims out from the other object.

With the bottom object selected. Copy and paste and move the new object down to here.

Use the Shape tool to pull the bottom center node down. Move the nodes and control points until the bottom of conforms to the shape in the image. Also make it not quite as wide as the object above it.

Select the middle object. On the Shaping panel click on Trim then select the bottom object.

Copy the bottom object. Paste and move the new object down sightly and make it a little wider.

Go over to Shaping panel and in the drop down menu choose Intersect. With the new object selected click on Intersect With.

Click on the object just above it and another object is created in the space where the two overlapped. Delete the lower object.

Copy the ellipse and shape it to the inside of the top of the lid.

Copy the ellipse again, paste and move the copy down to this top section of the inside of the lid. Shape it to fit.

With this shape still selected click on Intersect With on the Shaping panel. Click on the top ellipse to create a shape where the two overlapped. Select the bottom ellipse again and move it down and shape it to fit the next section.

Use the same process of Intersecting shapes to create the other sections of the inside of the lid.
Make sure that when you intersect the object it is with the object directly above it so that they are stacked in order with the bottom object also being the topmost object. That way when we color them none of the objects will be hidden behind others.

Create a copy of the ellipse again. Move it down and shape it to fit the bottom of the cup. Using the Bezier tool create a shape for the bottom of the cup. It should align with the outside edges of the bottom ellipse and fit within the shape above it.

Weld the bottom two shapes together and trim the lowest section of the black part of the cup from it.

Use the Bezier tool to create this outline of the lids slider.

Create this shape that extends above the slider.

Intersect that object with the slider outline.

Select the object again and move it down and to the left slightly.

Intersect it with the original slider object. Now you have three objects making up the lid slider.

Create an object using the Bezier tool for the entire area of the upper part of the handle.

Make this shape that extends past the edges of the previous object.

Intersect this object with the upper handle then create this next shape.

Intersect this object with the previous one. Create a line shape with the Bezier tool around the lower part of the handle and extend it into the upper part. Trim the upper part of the handle from this new object.

Create these two shapes that extend on either side of the lower handle.

Intersect them with the lower handle but don’t delete the extended shapes. Move them out farther on both sides and Intersect them from the two previous shapes.

Now is a good time to go over your vector art and look for anything that doesn’t look right, delete any unwanted nodes, make sure things are lined up correctly and add anything you think might make your art look better.
I added a small shape at the top of the silver part of the mug. I used the lowest part of the black lid section. I copied and pasted that part and moved it down slightly, then intersected it with the lower silver part, then deleted the unwanted part.
All of the outlines are now created. It’s time to add color. For information on how to use the tools to color your art see the tutorial Coloring Vector Art In CorelDRAW.

Using the Fountain Fill tool create a Gradient that looks something like this. It is done in CMYK colors using different tints of black. The tints are 100%, 80%, 100%, 100%, 80% and 100%.

Color this object with a two color gradient from 70% black to 100% black.

Make this one 100%, 80%, 100% and 100% black.

Make this one 90%, 70%, 90% and 100% black.

This fill goes from 100%, 80%, 100% and 100%.

The very top of the lid is a three color gradient that goes from 100% to 50% to 100% at a 60% angle with a 17% Edge pad.

These two small sections are 100%,100%, 70% and 100% black.

These three objects are 60% black.

This one is 70% black.

These three objects are 90% black.

These three are 100% black.

The top of the handle is 50% black.

For the bottom of the mug use a six part gradient with these positions. The percentages are 10% , 60%, 25%, 30%, 10% and 10%.

Delete the background image of the mug. Select all of the objects, Copy them, give all of the objects no outlines, Paste the copy and give everything no Fill and a 50% black outline.

Go through your Illustration and eliminate any outlines that you don’t really need such as inside the lid and on the grip of the handle. You can also send some of the outlines to the back to help with the final look of your vector art.

For a different way to create the silver bottom of this cup check out the tutorial called Coloring With a Gradient Mesh in CorelDRAW.